I have intermittent problems running PDF-eXPLODE. How do I configure PDF-eXPLODE for problem free processing?
ANSWER:
GENERAL
- It is very important that you install either of the 32 Bit or 64 Bit which matches your Windows architecture. If you don't, a 32 B installer cannot install the printer in a 64 B Win version. No error will occur - but no printer icon will appear either.
- You must be an Administrator with full privileges, to correctly install and configure this program.
When you move a license or install a new license, there are potentially a set type of problems that can occur once you start processing if the installed program has not been properly configured.
LOCATION OF PDFeXPLODE.INI (Configuration)
Your configuration consists of one or more (if saved by User) files called PDFeXPLODE.INI. This is a small file saved to your local or server hard drive. You will need to locate and copy this file in order to carry forward your configuration to the new location. If you were on any version prior to Version 4, once you have installed Version 4 and replaced the installed PDF-eXPLODE with the previous INI, you will need to open the PDF-eXPLODE Options menu screen and re-enter any password field as well as ensure all folder locations are still valid on the new PC/Server. Furthermore, please check that buttons and check boxes are correctly selected in the new Options screen as some options have changed in Version 4. Click Apply for any Message ID and then click Save to exit the Options screen.
- If using Version 4 and some late version 3 (from 2013), or Server version 3, the PDFeXPLODE.INI configuration file is located under the [installed folder]\INIS\%User% (by User)
- If using older Versions 1, 2 or 3 (Desktop Single User version) , PDFeXPLODE.INI configuration file is located under the User's Windows profile i.e C:\USERS\%User%\APPDATA\ROAMING\PDFeXPLODE\%User% (Win Vista, 7,8,10++) OR C:\DOCUMENTS AND SETTINGS\%User%\APPLICATION DATA\PDFeXPLODE\%User% (Win XP)
IF PRINTER ICON DOES NOT APPEAR IN PRINTERS & DEVICES
If the printer icon does not appear in the Printers and Devices, it means, in most cases, that you installed with a 32 Bit installer instead of a 64 Bit one where the Windows version is 64 Bit architecture. Do not try to install a Printer icon manually using an existing PDFeXPLODE printer as this does not work and is likely to give an " Error 545 cancelled by user".
We recommend you do not try to install the printer manually; instead:
- Uninstall PDF-eXPLODE
- Reboot the PC (or Server - take due care to ensure no Users are on connected)
- Reinstall using the 64 Bit installer into (preferably) a different folder (like C:\PDF-eXPLODE1\). The installer file name will show "64B" or "32B" in the name to indicate whether it is 64 or 32 Bit. This applies to late Version 3 (post 2013) and all Version 4
PDF-EXPLODE V3 or V4 INSTALLED UNDER WIN 7/8/10
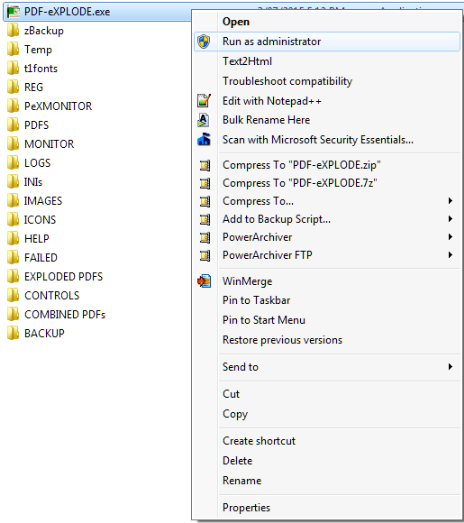
If you are using V3 of PDF-eXPLODE installed under either of Win 7,8 or 10 and you are following the configuration instructions, it is likely you may have set the "Run As Administrator" permission on the PDF-eXPLODE.EXE as shown in the following image: [accessed from right clicking on the EXE and selecting 'properties']
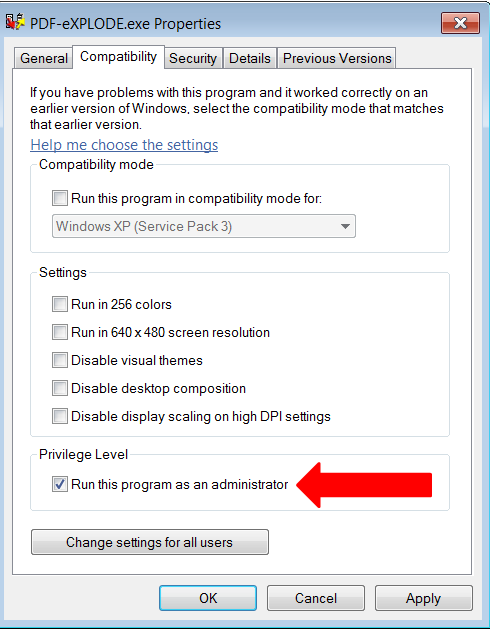
This must NOT be done under the aforementioned Windows environment as UAC (User Account Control) will block PDF-eXPLODE from opening and processing, when you click PRINT to PDFeXPLODE printer in your application.
If you have configured the EXE with Admin privileges, the PDF-eXPLODE V3/V4 print spooler log ( V3 : pdfexplodespl.log V4 : pexspooler.log) is likely to have log lines like these:
"Launching PeX ...
Line [492], Token does not have the privilege.
Line [740], CreateProcessAsUser failed, error code=1701596
Unable to launch PeX. "
No special 'Administrator' rights are required to run PDF-eXPLODE.
UPGRADING
- If you are upgrading or moving the existing license on the same server, you must uninstall the previous version . Before doing this, please backup and save your PDFeXPLODE.INI (configuration) file per user from the sub-folder INIs
- Always install V4 in a DIFFERENT folder (if this is an upgrade process you are doing) to V3 so no residual issues are brought forward to the new version with registry updates.
- After installing V4, replace the INIs by User into the INIs folder and open them from the PDF-eXPLODE Options.
- You can do this by creating a shortcut as follows: C:\PDF-EXPLODE\PDF-eXPLODE.EXE -Configure"Joe" (where the first part is the PDF-eXPLODE. EXE folder-path and name followed by one space, then "-Configure" immediately followe d in double quotes by the User ID for the relevant INI. When you click this shortcut, PDF-eXPLODE will open the Print Queue window and show User-Joe's PDFeXPLODE.INI currently under the INIS\Joe sub-folder.
- Next click on the PRINTER menu/PDF-eXPLODE Options.
- Review each screen for accuracy and re-save to convert the format to the latest V4 encryption/format (including any email message content). Password text must be reentered again as the password encryption algorithm has changed in V4 and you will avoid errors if you re-enter the text again.
- Look for any folder paths, including any HTML email message files. These files and the images contained therein, would need to be brought forward from the old PC.
UPGRADE ISSUE
This is the error: " The specified procedure could not be found"
The following applies to Version 4 ONLY! If you have just installed a Trial version or just moved the PDF-eXPLODE program/License to another PC and downloaded the latest version of PDF-eXPLODE ( V4.0.16.97 July 2015 or later ), then read on...
If you got a screen error like that shown below when PDF-eXPLODE is creating a Master PDF (as a result of clicking PRINT in your application),
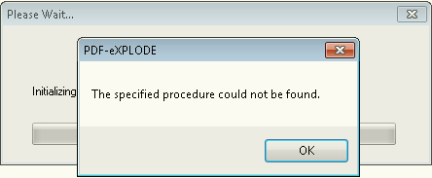
then this is a result of an incorrect setting in PDFeXPLODE.INI (found under [installed folder]\INIs\%UserID ) due to an issue that can occur on some sites when installing. Please adjust the following
- If the PeXPDF.dll file in [installed folder]\CONTROLS has a file size of 5 Mb and a modified date of 12/16/2009 (16 Dec 2009), then open PDFeXPLODE.INI (your configuration file) from [installed folder]\INIs\%UserID
- Search for the parameter PDFType=P or PDFType=; then change the P (or the blank "=") to A such that the setting is PDFType=A. Then Save the file.
- If the Option of PDFType= is not found, then add this option PDFType=A just one line under the top [OPTIONS] line
- Before you restart PDF-eXPLODE for processing, ensure that you End Process of pdf-explode.exe *32 in Task Manager/Processes tab.
If you are upgrading from any Version 3 to Version 4 (v4.0.16.97 Jul 2015++ onwards) and you experience the above issue, then you will need to ADD the PDFType=A parameter to your existing PDFeXPLODE.INI (brought forward from v3) on the second line just after the [OPTIONS].
RETIRING THE CURRENT PC/SERVER
- If you are moving the license to a new PC/Server as the current PC is being retired from service, then you need to ensure that 3000AD Systems ( support@3000ad.com.au ) has been notified and you request that the appropriate license(s) to be reactivated . Please allow up to 2 business days for the license to be reactivated (our current service standard is one business day).
- You must uninstall the program from the existing PC before retiring or disposing of the PC/server. Please backup and save your PDFeXPLODE.INI (configuration) file per user from the existing (current) sub-folder INIs before you retire and/or dispose of the PC.
- After installing PDF-eXPLODE on the new PC or Server, replace the INIs by User into the INIs folder and open them from the PDF-eXPLODE Options, review each screen for accuracy and re-save. Remember to change ALL Exploded Folder Paths in the General Settings ("default document path"), Mail Settings ("Exploded File Path") and each Message ID/Client ID under the Exploded File tab ("File Path"). All of these screens are accessed from Printer menu/PDF-eXPLODE Options from the main print queue screen
- Optionally bring forward any PDF archived files from the old outgoing PC/server. You can get the location from the Message ID and Mail Settings exploded PDF paths.
INSTALLATION
- Install the program – select defaults to install the program to C:\PDF-EXPLODE folder and for All Users
- After installation ensure your PDFeXPLODE printer icon appears. If it did not show up in Printers and Devices, it means you installed a 32 Bit installer in a 64 Bit PC. Uninstall, completely remove the install folder, reboot and reinstall and verify.
- After successful installation you must test the printer by right clicking on the Printer icon and select Printer Properties. On the General tab, select Print Test Page. If you get the error 'The specified procedure could not be found' immediately after you commence the Test Print, then this is a configuration error and you need to refer to the suggested fix above under 'UPGRADE ISSUE'.
- The test PDF will be saved in the default [INSTALLED FOLDER]\PDFS. Verify that the fonts are correct and the text is readable. If not please see this article to configure the fonts : When a User prints to the Printer Server from Windows 7 workstation, the PDF document is garbled.(missing characters, weird font, large space gaps)
LICENSING
Licensing involves updating the web database as well as updating the Demo flag field within PDFeXPLODE.LF license file to 'Licensed'. You get ONE activation and this must be used carefully to ensure the LF file gets updated, thereby avoiding on-going licensing issues. Under Win 7 and other recent Win versions, security permissions tend to block the LF update and consequently the file remains in 'Demo' or evaluation mode. Besides Win permissions, issues with licensing can also be caused by an active UAC (User Account Control). In some business environments, it may be necessary to turn off UAC (Win 7 and above) prior to Licensing, and reboot the PC, as this can block the License file update on your hard drive. If UAC is turned on (above the minimum level), then turn it off now and reboot. You may turn it back on after licensing. Proceed as follows:
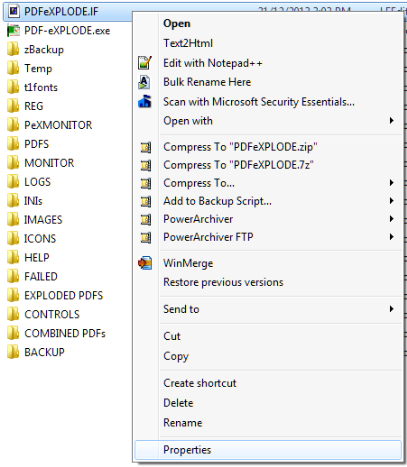
- Go to the C:\PDF-EXPLODE (or the installed) folder and find the file PDFeXPLODE.lf.
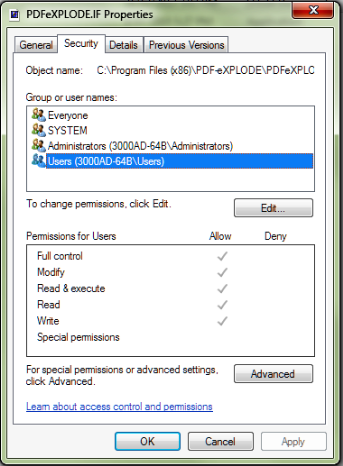
- Now Right click the file and from the pop-up menu, select Properties . When the Properties screen appears, click on the Security tab when the Properties window opens. Highlight the Group: All Users or Users or Everyone (whichever appears) ; check if the Allow column has ‘Full Control’ checked for Users/Everyone and/or All Users .
-
- If Full Control under Allow column is not checked, then click the EDIT button.
-
- Highlight the All Users or Users or Everyone (do this one at a time) in the GROUP or Username window at the top, then click the Full Control checkbox under the Allow column (in the Permissions window) – see the picture below,
- Everyone and Users appears with Full Control – each time you do Everyone and/or Users, click APPLY, then highlight the next Group and again, check Full Contro l under the Allow column and then APPLY again.
- You can now click OK if both Everyone and Users lines show Full Control checked under Allow column in the Permission window.
- Now, go to the PDF-eXPLODE program folder and find the file PDF-eXPLODE.EXE . Then right click on the EXE file and select Run As Administrator from the drop down menu. This is compulsory
4. When the PDF-eXPLODE Evaluation screen appears, select " Activate online" and then click the " Continue " button.
5. When the "Unlock via Internet" dialog appears, enter the License ID and password and click OK.
6 . You must not only get the 'success' message but the evaluation screen must immediately close or else the local pdfexplode.lf file has not been updated and PDF-eXPLODE remains in demo mode but your one license activation is used up.
7. If this happens, contact support@3000ad.com.au . Allow up to 24 hours to get reactivated, If you should try to reactivate again, you WILL get an error "No Remaining Activations"
FOLDER PERMISSION CONFIGURATION
- Under Win Vista/7 and beyond, folder permissions are very important for creating or modifying files (temp or data files). Without correct permission to create or modify files, PDF-eXPLODE processing will fail. At the end of installation you must verify if the PDF-eXPLODE folder (and sub-folders) has “FULL CONTROL” permissions…. See the sub-points in #8 for instructions). Sub-folders will inherit permissions by ensuring the parent folder is properly assigned the required permissions.
- IF you are going to archive /save PDF-eXPLODE generated PDFs outside the installed folder, then verify that the Program folder security permissions has FULL CONTROL for “All Users” :
-
- by right clicking the folder name in Win Explorer,
- then select PROPERTIES,
- next select SECURITY tab.
- Now click EDIT button and then on the next screen highlight the All Users (or Users or Everyone group- as appropriate to your situation)line in the Group window and
- click each checkbox under ALLOW column in the Permissions window .
- Now click APPLY and then OK.
- This may already be set as the installer attempts to do this during PDF-eXPLODE installation and it depends on the permission level of the person installing it
3. N ow proceed to apply similar permissions to ANY folder(s) that will be used for saving Master and Exploded PDFs. This can be done later if you are unsure at this stage. Apply folder permissions to C:\TEMP\PDFeXPLODE too.
4. If you are intending to SAVE any exploded or Master PDFs to a foreign drive/server, then as the Report Server operates under Local System, it is absolutely critical you :
Share the Folder
Add the Local System as “User”
Provide FULL CONTROL permissions to that Local System
5. IF you are installing a Server version of PDF-eXPLODE and if a LOCAL Server (where PDF-eXPLODE is installed) drive is mapped with another drive letter – DO NOT USE the mapped drive path in any PDF-eXPLODE folder path configuration; instead use the full local path as applications cannot use mapped drives if the mapping is for a local folder
ANTI-VIRUS SOFTWARE "WHITE LISTING"
If you see that PDF-eXPLODE.exe and/or the PDFeXPLODE Printer icon gets suddenly deleted, it is very likely that your Anti-Virus software is the cause of this issue. Please virus check the PDF-eXPLODE folder and once passed as OK, then configure the Anti-Virus software to EXCLUDE both the folder where PDF-eXPLODE is installed and its program EXE under the AV software Setup options . This action will require Admin permissions..
CONFIGURING THE PDFeXPLODE PRINTER
When PDF-eXPLODE is installed, most environments appear to block some or all of the configuration that is done by the installer. For this reason, it is essential you follow the instructions in the attached "How to configure the PDFeXPLODE Printer.PDF" document. This configuration done by right clicking the PDFeXPLODE printer under Printer and Devices and select PRINTER PROPERTIES. Next configure both the GENERAL Tab/Preferences button and the ADVANCED tab/Printing Defaults button. They look similar but actually update different sections of the registry.
PRINT SERVER VERSION ONLY
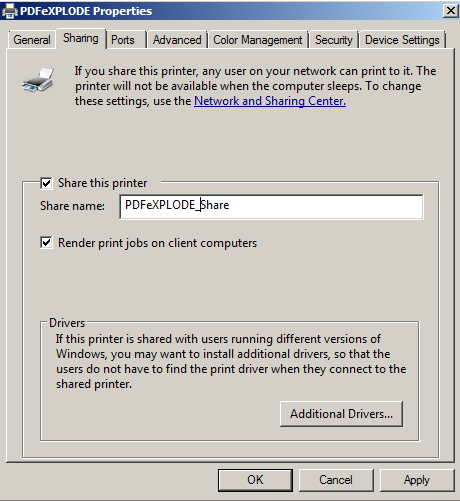
After installation, please open the Devices and Printers . Now right click on PDFeXPLODE printer and select Printer Properties. Now click on the Sharing tab and check the box to "Share". This step is critical to the workstation being able to share and "see" the PDFeXPLODE printer
WORKSTATION PRINTER DRIVERS (Print Server Version Only)
If you are using any version or User pack of Print Server license, it is necessary to install the PDFeXPLODE printer (only) on each workstation where PDF-eXPLODE processing is intended. Please read the following:
You can also click here to source the PDF : PDFeXPLODE Print Driver installation for version - Print Server
TESTING THE PROCESS
It is important to test the configuration and processing.
PRINTER: You should have done this previously under INSTALLATION #3. You test the printer by right clicking on the Printer icon and select Printer Properties. On the General tab, select Print Test Page. The test PDF will be saved in the default [INSTALLED FOLDER]\PDFS.
EMAILING: You can do this simply by adding the email settings to the PDF-eXPLODE Options/Mail Settings/E-mail Connection settings screen. Press Test Connection . An email will be sent to the Sender address. Check if the email has been received. It is also necessary to verify that the email Test Connection button works when sending emails externally (outside the company's domain). You can do this by changing the Sender address to a Web email address like Gmail/Yahoo/Hotmail and the like.
PROCESSING:
Login to the Server or Desktop PC as a normal User (non-admin).
Open Notepad and change the Font to Arial / 10 pitch. Now at the head of the text document (line 1) type a tag like this:
<pdfexplode>mail@3000ad.com.au</pdfexplode>
Between the front and back pdfexplode 'node', insert an email of your choice to replace the 'mail@3000ad.com.au'. On the second line, just insert any text: e.g. "Test document".
Now select FILE / PRINT and select the just installed PDFeXPLODE printer. This should process and send an email to the address shown between the front/back nodes. This email will probably have no text message if none was entered in the Options/ Mail Settings screen.
If no exploded document was generated nor email was received, then check to verify if the fonts are readable in the 'master PDF - which will be saved to the PDFS sub-folder by default. Please also look at the PDF-eXPLODE.Log which would have a line "Total No of files that have to be generated = 0" indicating that the exploding engine did not "find" any tag to explode. You may have to troubleshoot the reason, if you believe a proper tag was inserted into the document. This article can be of assistance in trouble shooting problems with the exploding or emailing process: Troubleshooting process errors
 Comments

 You Can...
 Article Rating
 Attachments (2)
 561.19 KB)